As a maker, I am constantly finding new and exciting technologies and techniques to use in my art projects and builds. Since the early 2000s, I have worked on dozens of art installations and prop and costume builds. Here you will find information and photos of past projects that I am most proud of.
T-60 Power Armor Costume
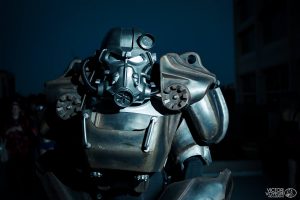
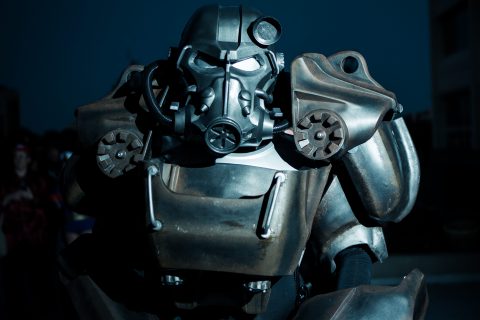
This set of costume armor from the game Fallout 4 is a full scale suit of fiberglass and cast resin parts. The wearer stands at 7 feet tall on a set of custom designed and fabricated welded steel stilts, but due to the materials used in the fiberglass lay up, the total weight of the costume is a mere 35 pounds. An internal cooling and padding system allows the wearer to comfortably wear the costume for several hours at a time.
Designed from 3D files originating from the game that were then extrapolated and further detailed, the original sculpt was printed on a fleet of 3D printers and cut using a CNC router. These parts were then assembled and finished to a flawless quality, and were then molded for resin casting and fiberglass lay up. Several painting techniques were used to achieve the final result that looks both realistic and accurate to the source material.
The delivered parts are strong and light weight, allowing the wearer to have comfort and freedom of movement while still standing at an imposing height. This project was completed in 2016.
Civil Protection Costumes
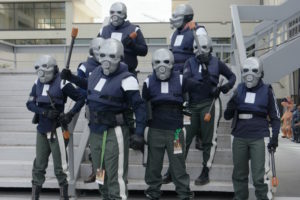
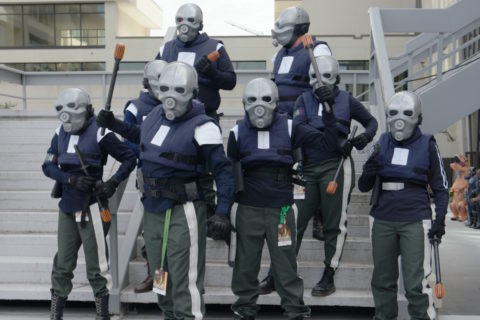
This group costume build was a long term goal of mine to build the iconic enemy characters from my favorite video game, Half-Life 2. This project was a culmination of my skills and abilities up to this point. Combining 3D printing, casting, and traditional fabric work to achieve an authentic look. The helmet, designed in collaboration with 3D artist Alex Winslow, was cold-cast in aluminum for a realistic metallic finish, while the armor and uniform details were carefully tailored to match in-game references.
Custom-designed functional voice modulation radios, and a meticulously crafted Stun Stick modeled from in-game references. Every element, from the hand-quilted flak jacket to the embroidered insignia, was designed to match the game’s aesthetic while ensuring durability for conventions and events.
The final costume debuted at Dragon Con, receiving praise for its accuracy and craftsmanship. By blending modern fabrication techniques with classic prop-making methods, this build brings one of gaming’s most recognizable antagonists to life.
A total of 10 complete costumes were created for the group. This project was completed in 2018.
Gravity Gun Prop
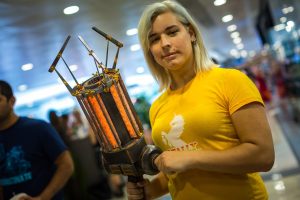
Built in 2010, this prop was my first experience with 3D printing and laser cutting and opened my deep interest in digital fabrication. This was also the most complex electronic project at the time and taught me a number of lessons in design and application.
The CAD design was based off of the original game model for geometric accuracy, and details were refined and added to make the final piece visually appealing compared to the low resolution original model. The majority of the build was made from stacked laser cut acrylic parts which were chemically welded, and the rear body was 3D printed in several parts which were fused before being finished. The rear body was then molded and a hollow rotocast reproduction was made.
The prop uses real hardware for the several dozen nuts and bolts and hold the front and rear sections together. Nearly 200 LEDs were wired to produce the dual color lighting effects. This project was completed in 2011.
Furiosa’s Bionic Arm Prop
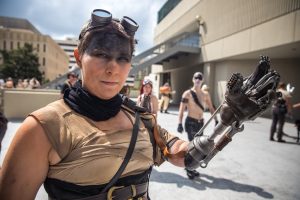
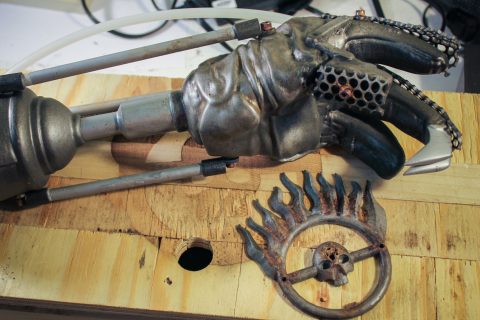
This prop was a passion project and a dream come true – building a real working prosthetic for the cosplayer who contacted me about making her a real Furiosa bionic arm. This project was also the first that required major 3D scanning to produce accurate results.
The client is a congenital amputee of her left arm, and to make a properly fitting prosthetic, a life cast was molded and cast from plaster. This plaster reproduction was then 3D scanned and used for the basis of the 3D model. Because the arm cup was designed around an accurate scan of her arm, the fit and scale of the final project was perfect.
The design was then 3D printed and finished over the course of several weeks. A custom and screen accurate leather harness system was also fabricated to attach the arm and shoulder piece to the cosplayer. This project was completed in 2015.
Colonial Marines Costumes
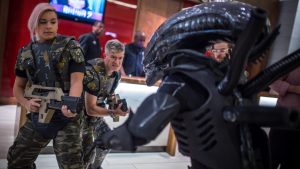
This group costume build was the result of an educational opportunity of mine at a local Atlanta makerspace, where I led and instructed a group of makers and artists to create an accurate replication of the armor from the film Aliens.
The group met on the weekends over the course of several months, where we created vacuumforming bucks and 3D printed masters. The bucks were created using laser cut cardboard that was laminated with fiberglass, refined using body filler, and back filled with plaster. The 3D printed parts were finished and molded in silicone before cast resin parts were produced.
In total, over 250 individual parts were created for 15 finished costumes. This project was completed in 2015.
Ultron 5 Cosplay
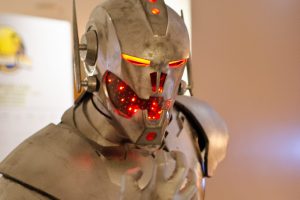
This costume was created for a client using light weight L200 sheet foam for the body, a rotocast resin light weight helmet, and a complex Arduino-driven LED matrix for the lighting effects.
The body was designed in 3D and turned into 2D templates, which was then laser cut from L200 and sheet PVC. The sheets were then heat formed into shape around a life cast reproduction of the client. The body panels were fastened using flexible straps and velcro strips to allow them to easily get in and out of the costume without the need of a handler.
The helmet was 3D printed on a large format printer, where it was then finished to a mirror shine and molded in silicone. The cast resin parts were cleaned and painted in preparation for the custom LED matrix. 150 LEDs were wired to a custom fabricated PCB and programmed through an Arduino microcontroller. The final parts provided an excellent range of motion and visibility, as well as a unique result from the LED matrix effects. This project was completed in 2014.
RepRap Wilson 3D Printer
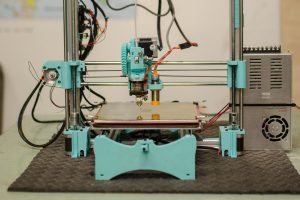
I built a pair of twin RepRap 3D printers for a local Atlanta makerspace using open source plans and reclaimed hardware. The goal of this project was to rebuild a broken 3D printer into a modern RepRap design using all parts reclaimed from the original.
I chose to use the “Wilson” RepRap due to it’s simplicity and reliance on very little non-3D printed parts. The replacement parts were printed on another 3D printer in my fleet.
The total rebuild took only a couple of weeks, and the end result was a printer that was vastly superior to the original machine that was used for parts. This printer was donated to the makerspace for their community to use in future projects. The twin machine I built to the same standards and was integrated into my printing fleet. This project was completed in 2016.
